September 10, 2025
Curbless showers built to last: slope, membranes, and drain choices homeowners should know
Curbless shower waterproofing is the foundation of a beautiful, accessible bathroom that will not leak or fail. In this guide, you will learn how slope, membranes, and drains work together to create a durable, low-maintenance shower that looks great and stands up to daily use. Whether you are remodeling your primary bath or designing a guest suite, this article shares expert tips to help you avoid common mistakes and make smart choices. If you live in southeast Wisconsin, Elite Improvements in Burlington can help you plan and build a curbless shower that is safe, stylish, and built to last.
Why curbless showers are different
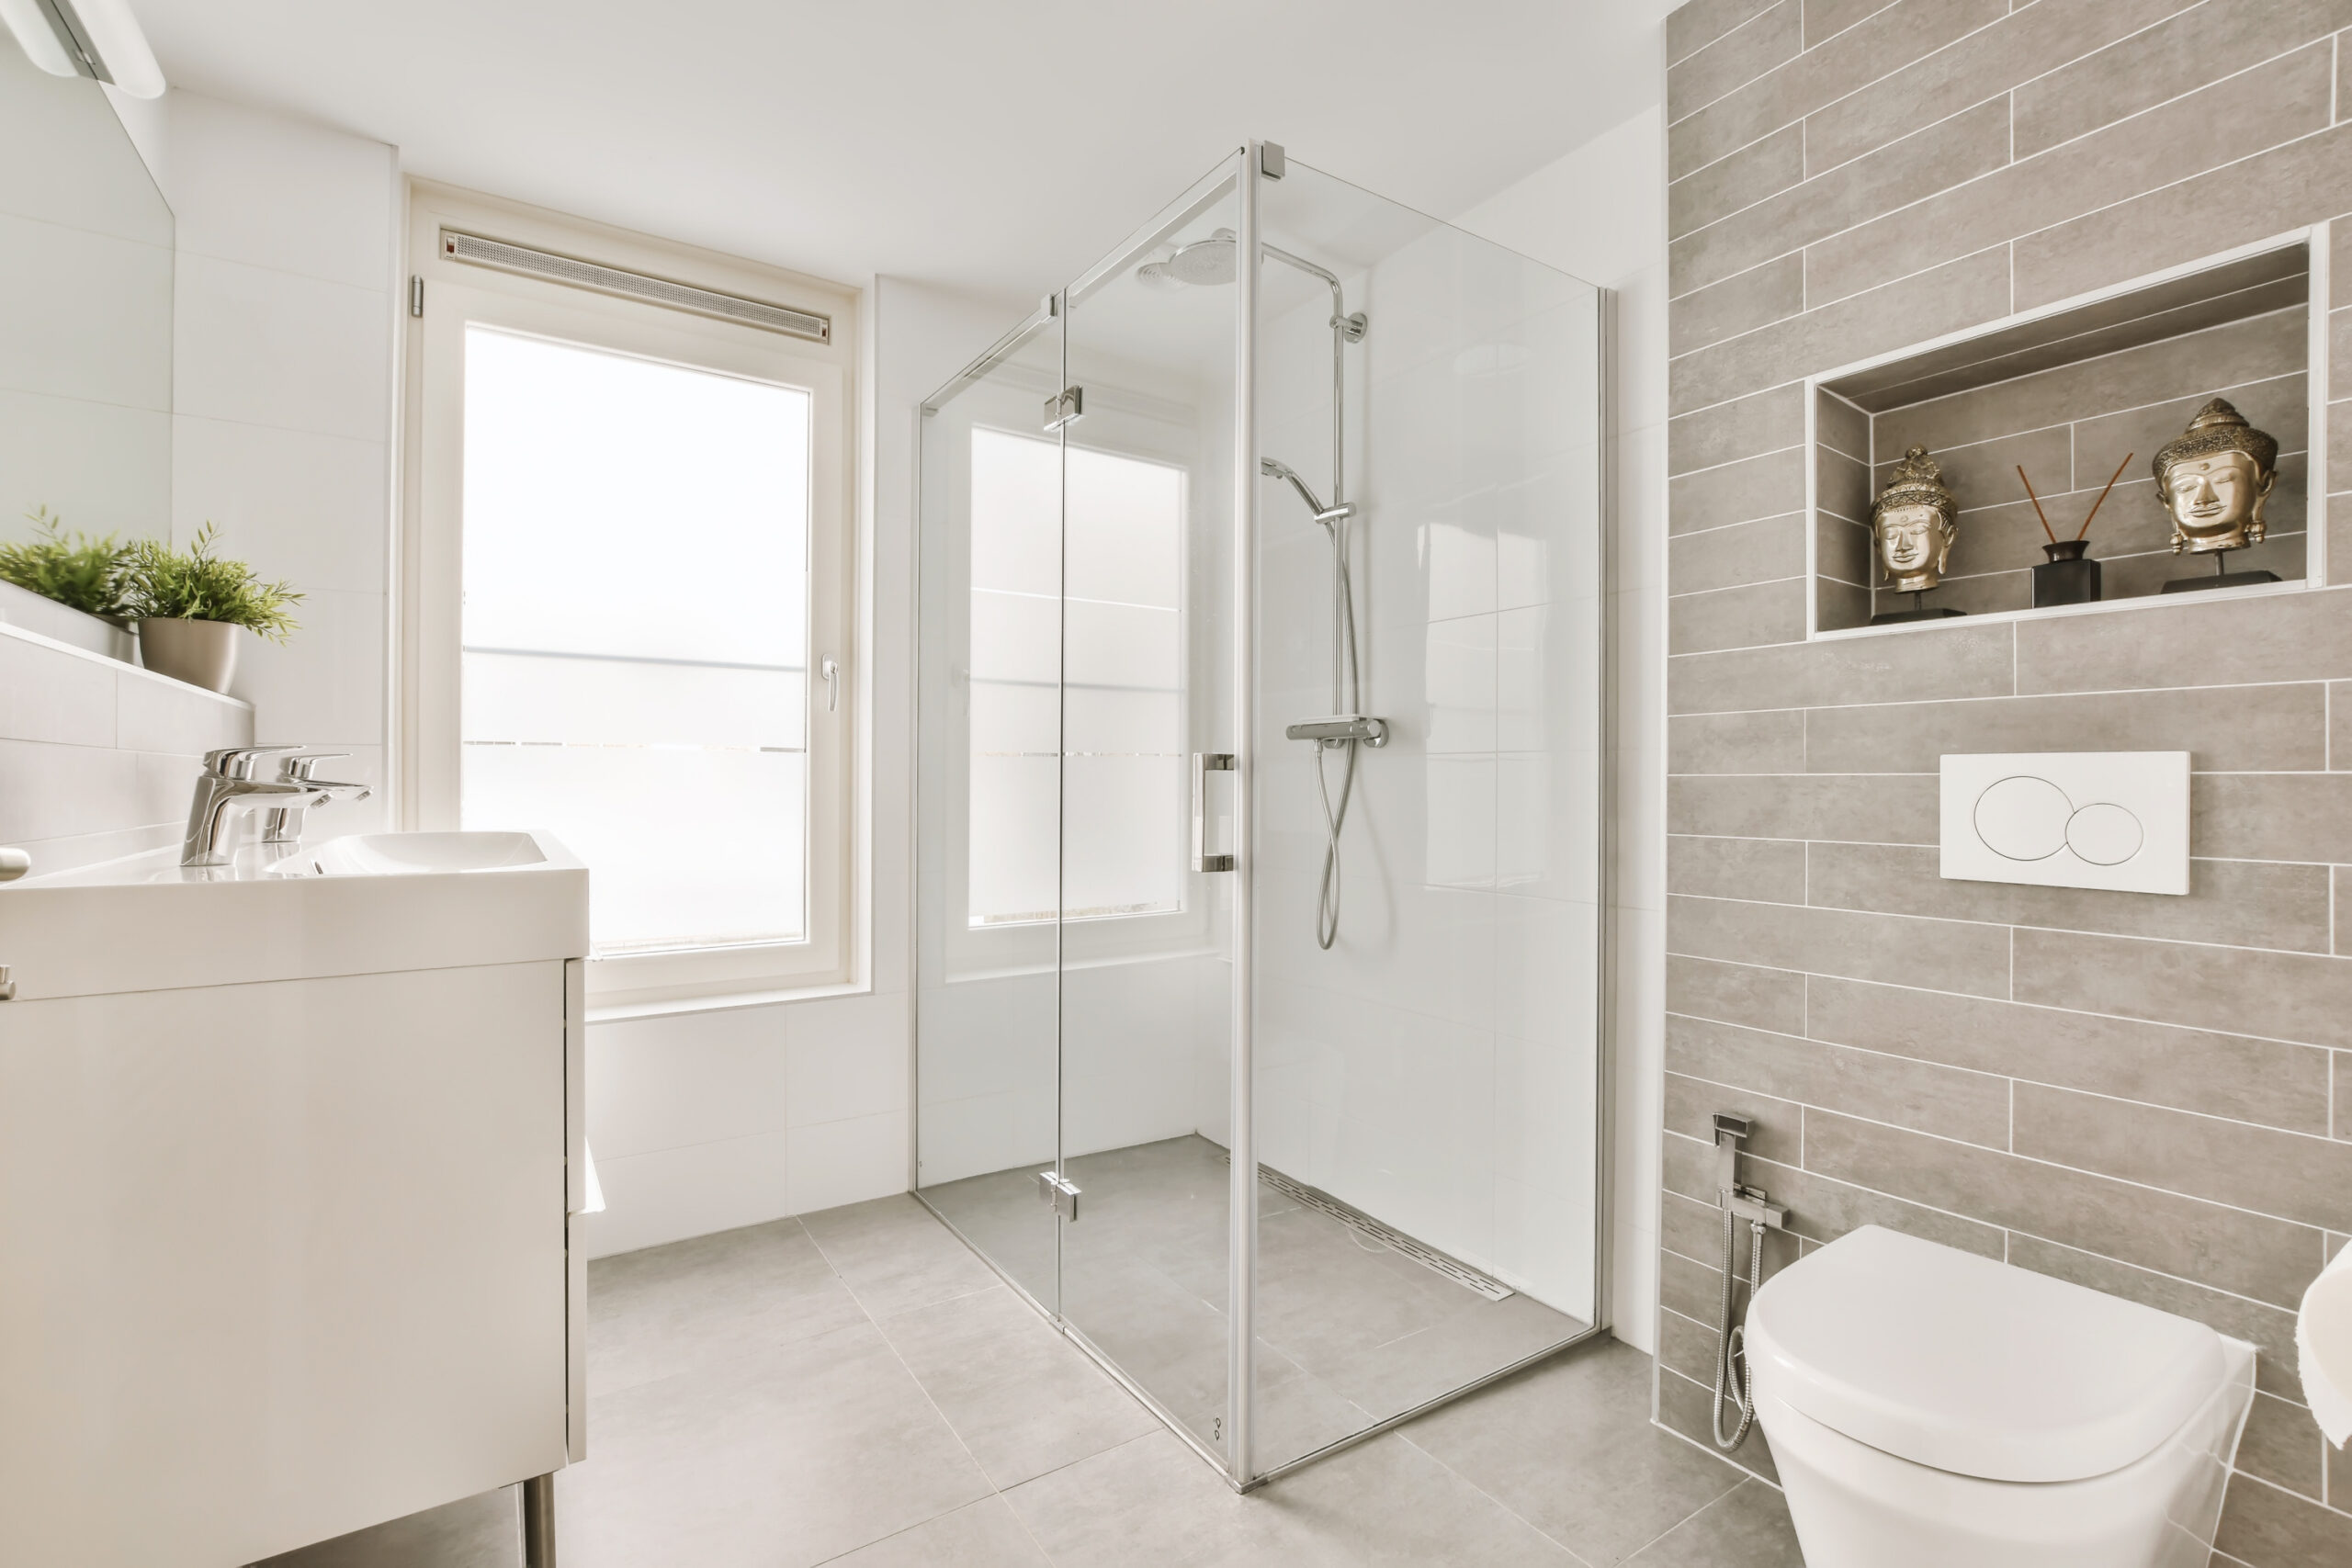
A curbless shower eliminates the step over a traditional curb. The bathroom floor flows directly into the shower area. This design improves accessibility, reduces trip hazards, and creates a clean, modern look. The missing curb also means water can escape the shower zone more easily if the system is not designed correctly. That is why curbless shower waterproofing is more demanding than a standard shower. It requires correct slopes, continuous waterproof membranes, and compatible drains that move water quickly and safely to the plumbing system.
When done well, a curbless shower offers easy cleaning, better wheelchair access, and a sleek open layout that makes small bathrooms feel bigger. When done poorly, it can lead to puddles, loose tiles, damaged subfloors, and costly repairs. A careful plan and experienced installer are essential.
The science of slope: get water moving
How much slope do you need
Most building codes and industry standards recommend a minimum slope of 1/4 inch per foot toward the drain. This applies to the shower floor and any part of the bathroom floor that can get wet inside the wet zone. The goal is to move water to the drain quickly without making the floor feel steep or unsafe. With a point drain in the center, the floor needs a uniform four-way slope. With a linear drain, the slope usually runs in a single direction, which can be more comfortable underfoot and easier to tile with larger format tiles.
Sloping the main bathroom floor
In a curbless design, the transition between the bathroom floor and the shower must be flush. To achieve this, the shower area is often recessed by lowering the subfloor between joists or using a pre-sloped foam pan. Another option is to strengthen and shave the subfloor to create a gentle ramp, but structural evaluations are required. Elite Improvements evaluates joist size, span, and deflection to confirm the structure can support tile and a wet area. Proper slope at the shower entry is critical to stop water from creeping into dry areas.
Common slope mistakes to avoid
- Flat spots or birdbaths that trap water and cause grout discoloration and slippery patches
- Inconsistent slope that makes the floor feel tilted or awkward
- Over-sloping that is hard to stand on or roll over with a chair
- A hump at the drain caused by poor setting of the flange or buildup of thinset
- Misalignment with large format tile that leads to lippage and standing water
Waterproofing membranes that last
Curbless shower waterproofing must be continuous across the entire wet zone. That includes the shower pan, walls, bench, niches, and the area just outside the shower where overspray occurs. The membrane should integrate with the drain and extend at least several inches beyond the entry. There are three primary membrane approaches used by pros in Wisconsin homes.
Sheet membranes
Sheet membranes are rolled or sheeted waterproof materials that bond to the substrate with thinset or an approved adhesive. They offer consistent thickness and low permeability. Seams overlap and are sealed using matching banding or sealant from the same manufacturer. Advantages include reliable performance, quick coverage, and fast flood testing. Key best practices include clean substrate, tight seams, two-inch minimum overlaps, preformed inside and outside corners, and sealing all penetrations.
Liquid-applied membranes
Liquid membranes are painted or rolled onto the surface, then cure into a seamless waterproof layer. They are excellent for complex shapes like benches and niches. Proper dry film thickness is essential. Multiple coats are often required, applied in perpendicular directions. Reinforcing fabric at plane changes and around drains increases reliability. Follow the manufacturer’s dry times before flood testing. Liquid systems can be very robust when installed to spec and allowed to cure fully.
Foam shower pans and ready-made bases
Pre-sloped foam pans simplify installation and deliver consistent falls to the drain. When used, they must be paired with the exact drain and membrane system they were designed for to keep warranties intact. Transitions to adjacent floors should be feathered smoothly to maintain a flush entry. Foam pans are lightweight and help when framing recesses is not practical.
Traditional liners
Traditional PVC liners with clamping drains are common in curbed showers but are less ideal for curbless installations. The liner sits below the mortar bed and can leave water in the bed longer. Modern curbless designs typically use bonded waterproofing systems that bring the membrane right to the surface and directly into the drain. This reduces water absorption and speeds drying.
Vapor control and steam considerations
For standard showers, a waterproof membrane is enough. For steam showers, a vapor-retarding membrane with a low perm rating is required on all walls and ceilings. Avoid creating a moisture sandwich by installing both a plastic vapor barrier behind cement board and a surface membrane on the front. Choose one system according to the manufacturer’s instructions and local codes.
Critical details for a watertight system
- Integrate the membrane with the drain’s bonding flange or clamping ring
- Use compatible sealants and accessories from the same system
- Seal all fastener penetrations above the wet zone and avoid them below the flood level
- Waterproof the floor outside the shower entry to capture overspray
- Perform a flood test for 24 to 48 hours before tiling
- Honor movement joints at walls, floors, and transitions using flexible sealant
Drain choices homeowners should know
Linear drains
Linear drains sit along one edge of the shower or at the entry. They let you run a single plane slope and use larger tiles. For wheelchair accessibility, linear drains often provide the smoothest rolling surface. They can be placed against a back wall or at the entry to collect water before it leaves the shower zone. Look for linear drains with a bonded flange that ties directly into the sheet or liquid membrane. Choose a grate style with enough flow capacity for your fixtures.
Point or center drains
Point drains are common, cost effective, and compatible with many systems. The floor slopes from all directions to the center, which usually requires smaller tiles for flexibility. With a well-executed pre-slope and pan, point drains can perform just as well as linear drains. Ensure the tile cuts around the drain are clean and the drain height is set to match tile thickness plus thinset.
Wall and hidden slot drains
These drains capture water at the wall line and create a minimalist look. They can be excellent for curbless designs but require precise framing, blocking, and waterproofing. Tolerances are tight, so they are best installed by experienced remodelers.
Flow rates and plumbing considerations
Match the drain and trap size to your shower’s water output. Large rain heads and body sprays can exceed standard flow rates. Most showers in Wisconsin use a 2 inch drain line, but complex systems may need more capacity. Verify venting and trap placement during planning to avoid slow drainage and gurgling.
Building a curbless shower that never leaks: a step-by-step overview
- Plan and design: Define the wet zone, drain location, tile sizes, and layout. Choose your curbless shower waterproofing system early to ensure all parts are compatible.
- Evaluate structure: Check joist size, spacing, and deflection. Plan recessing or sistering as needed to achieve a flush entry without weakening the structure.
- Rough plumbing and blocking: Place the drain, confirm heights, and add solid backing for future grab bars, benches, doors, and glass panels.
- Recess or pre-slope the shower area: Use a sloped foam pan or form a mortar pre-slope that directs water to the drain everywhere, with no flat spots.
- Install backer board: Use cementitious or foam backer compatible with your chosen membrane. Leave appropriate gaps at floors and corners.
- Waterproofing: Apply a sheet or liquid membrane across the shower floor, up the walls, and slightly outside the shower entry. Seal seams, corners, and penetrations carefully. Integrate the membrane with the drain per the manufacturer’s detail.
- Flood test: Plug the drain and fill the pan to the threshold. Hold for 24 to 48 hours and check for leaks. Do not skip this step.
- Tile installation: Set tile with polymer-modified thinset unless your membrane manufacturer requires unmodified. Use small or mosaic tiles on tight slopes and larger tiles on single-plane slopes. Maintain a flat surface with correct coverage.
- Movement joints: Caulk changes of plane and perimeters with 100 percent silicone. Do not grout these joints.
- Grout and finish: Choose grout suitable for wet areas. Epoxy grout offers stain resistance, while high-performance cementitious grout is a solid option. Seal natural stone if required.
- Glass and trim: Use proper shims and sealants at panels. Avoid drilling through the waterproofing below flood level.
- Final check: Test drainage, inspect slopes, and confirm a tight seal at the entry zone.
Tile, grout, and expansion joints matter
Tile choice affects safety and performance. Smaller mosaics with more grout lines can provide better traction on sloped floors. For linear drains with a single-plane slope, larger tiles are possible and often preferred for a seamless look. Choose a grout that resists staining and shrinkage. In a wet area, movement joints are required at perimeters, around columns, and at changes in plane. These joints prevent cracking by allowing slight movement. Use silicone that matches your grout color for a clean finish.
Accessibility and aging-in-place benefits
Curbless showers support universal design. A flush entry makes daily life easier for everyone. Add grab bars anchored to solid blocking, a handheld shower on a slide bar, and a built-in bench or fold-down seat. A linear drain paired with a single-plane slope creates the smoothest surface for rolling in a chair or walker. Heated floors outside the shower can help dry surfaces faster, reduce slips, and add comfort during Wisconsin winters.
Maintenance tips to protect your investment
- Use a squeegee after showers to reduce water spots and soap buildup
- Clean the drain grate and hair trap regularly to maintain flow
- Inspect and replace silicone at corners and perimeters as needed, typically every one to three years
- Follow the tile and grout manufacturer’s cleaning guidelines, avoiding harsh acids and abrasives
- Run an exhaust fan during and after showers to control humidity
- Reseal natural stone surfaces according to the sealer schedule
Why homeowners in southeast Wisconsin choose Elite Improvements
Elite Improvements is a family-owned home improvement company in Burlington, Wisconsin. We serve southeast Wisconsin with high-quality remodeling, home additions, and exterior improvements. Our team focuses on craftsmanship and clear communication, so your project runs smoothly from design through final inspection. We are accredited by the BBB and Milwaukee NARI, which means we follow ethical practices and industry standards you can trust. When it comes to curbless shower waterproofing, we combine proven methods with manufacturer-approved systems and local building code knowledge to deliver reliable results.
Our services include complete bathroom remodels, kitchen and basement updates, master suite renovations, and living room makeovers. We also build home additions such as bathrooms, bedrooms, kitchens, home offices, and sunrooms, as well as bump-outs for extra space. On the exterior, we provide roofing, siding replacement, and custom deck installations. If you want a single partner for design, construction, and finishing touches, Elite Improvements is ready to help.
Our curbless shower process
We start with an in-home consultation to understand your goals, measure the space, and review structure and plumbing. Next, we collaborate on a layout that supports proper slopes, drain placement, and curbless shower waterproofing. We help you select tile, fixtures, and glass that fit your style and budget. During construction, we protect your home, recess or pre-slope the floor, install a compatible membrane and drain system, and perform a flood test before any tile is set. After tile and glass are installed, we complete a thorough quality check. You receive maintenance guidance and documentation for your records.
When a curbless shower needs extra planning
Some homes need special solutions. Slab-on-grade foundations, shallow joists, or plumbing constraints can make a full recess difficult. In these cases, we may use a low-profile linear drain at the entry, a slightly extended wet zone, or a thinner tile assembly with a foam pan. Our goal is to maintain a flush entry and continuous waterproofing without compromising structure. We coordinate with local inspectors to ensure compliance with southeast Wisconsin codes.
Budget and timeline insights
The cost of a curbless shower depends on structural work, drain choice, tile and glass selections, and whether the bathroom is part of a larger remodel. While ready-made pans can reduce labor, custom mortar work may be needed to achieve a perfect flush transition. Linear drains and large-format tiles require precise installation. Most projects take several weeks from demolition to final glass installation, depending on material lead times and inspection schedules. Planning ahead helps keep the project on track.
Curbless shower FAQs
- Do curbless showers leak more often than curbed showers? Not when designed and built correctly. Proper slope, continuous membranes, and a compatible drain eliminate leaks.
- How long should the flood test last? Most systems call for 24 to 48 hours. Follow your membrane manufacturer’s guidelines.
- Can I use large tiles on the shower floor? Yes with a single-plane slope and linear drain. For four-way slopes to a center drain, smaller tiles are usually better.
- What grout is best for a curbless shower? Epoxy or high-performance cementitious grout works well. Choose based on maintenance preferences and tile type.
- Will a curbless shower work in a small bathroom? Yes. Smart drain placement and a glass panel can keep water in the wet zone while maintaining an open feel.
- Do I need a special drain for curbless shower waterproofing? Use a drain that integrates with your chosen membrane and has enough flow for your fixtures.
- Is a curbless shower good for aging in place? Yes. It removes a tripping hazard and supports grab bars, benches, and handheld showers.
Pro tips for a durable, leak-free build
- Choose one compatible system from substrate to drain to membrane to ensure warranties and performance
- Slope the substrate before installing the membrane to avoid thick build-ups and humps
- Waterproof at least a few feet outside the shower opening to catch overspray
- Use preformed corners and seal all penetrations for valves, body sprays, and niches
- Confirm drain height before tiling to achieve a flush, even grate with clean cuts
- Include solid blocking for future grab bars even if they are not installed today
- Keep maintenance simple with easy-to-clean grout and accessible drain screens
Work with Elite Improvements
If you want a curbless shower that looks amazing and performs for years, partner with an experienced team that understands curbless shower waterproofing from the framing to the finish. Elite Improvements brings craftsmanship, clear communication, and a commitment to your satisfaction. We serve Burlington and the greater southeast Wisconsin area. Contact Elite Improvements at 262-716-6663 or visit eliteimproves.com to schedule your consultation and start designing a bathroom that is safe, stylish, and built to last.
Related Posts
How to Design a Modern Ranch for a Small Lot
Why Modern Ranches are Taking Over Lake Geneva
Lake House Features That Actually Handle Humidity
